1. Open a new document with white background and 420 x 100 pixels.
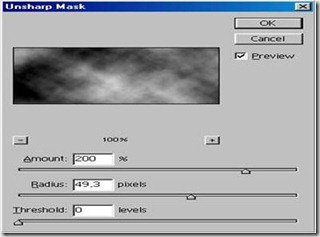
2. Go to Filter > Render > Clouds and then, go to Filter > Sharpen > Unsharp Mask, using the following Unsharp Mask values:
3. Make a new layer, and using the brushes that I'll provide below, apply them in a way that you like the result. (Don’t apply the same more than one time)
Brushes:
4. I used some of the brushes above, I came to the following result:
5. Select the top layer and click on the little circle, half black and white on the bottom of the layers box, then click on Color Balance, as shown in the image:
6. It will open a popup window, where you can change the settings the way you want, clicking on Shadows, Midtones, Highlights.
7. You can put some additional brushes. I put Nickmeister_brush_setv2.
8. Finally, you can choose the images to be placed or written.
My final result:


![clip_image002[1] clip_image002[1]](https://blogger.googleusercontent.com/img/b/R29vZ2xl/AVvXsEiRM-ddMwnZIvvUIBMMVbrLNFUjJnvH7UE9EcTMQhWyvw6p8Ki6kQTPRJOpcyZIQRgIrpU-LX8tP23U6q4lS3efOLhNSIyvFljhEBrW8Nku4Zq9yNOsclqPgWiub9JW43tpfhmn890iO0o/?imgmax=800)
![clip_image002[3] clip_image002[3]](https://blogger.googleusercontent.com/img/b/R29vZ2xl/AVvXsEie5XB4EPJJCCnWWHA4nbe_30HfzNoyqR2EB0yCCyzzOCp5nUK9whtagdAuTj1kH0oXOiV6y1crPXTn5AcKR0EgksqCYbjfZrqoCqLAHVt7jaOdX359OHqYKBaH_o20HUToHrEmciUUH0I/?imgmax=800)
![clip_image002[5] clip_image002[5]](https://blogger.googleusercontent.com/img/b/R29vZ2xl/AVvXsEjwKnq9p1569HeyhRTGpsb37SBHfpUQ9pKKrS0V9xSeRTKl0uz-dgkdxRFz_8gbFmszjYHC-wEt_K5ZL43-Go2kAGmosNBBtYTrZD8TUFIKj0CIH8zFb26CRJInufWQYhlE1SeD_thBDXY/?imgmax=800)

![clip_image001[5] clip_image001[5]](https://blogger.googleusercontent.com/img/b/R29vZ2xl/AVvXsEiLbgu4onMcP2iS_nBkEnFgL90gxM-cjaS1Y8MEEgmH7majhK5sAoQ6gpnRrTYtQXFfvzjQeRImzkRnS25vrywf3ossOv7e4SvOlN7IBN6J3QThwZFlTbnlJY_uUQ1zNubPrYAnIjQuRkY/?imgmax=800)
No comments:
Post a Comment